
John Veil
April 2020
One of the first accessories I add when I get a new kayak is
rod holders. When I first got into kayak fishing, I began using Scotty
products. There are other good alternative brands, but I always stuck with
Scotty bases, rod holders, and other related parts — I use that brand as
examples below. Most rod holder systems have at least two components — the rod
holder device, and a base into which the holder is inserted.
Getting Started
Before starting on the project, you should evaluate how your kayak is laid out.
For example:
- Are there built-in gear tracks that could hold a rod holder base?
- Are there built-in flush mount rod holders already there?
- Are there flat spots on the top surface of the hull where you could place a rod holder?
You should also think about the following (there is no right or wrong answer — it is based on personal preference).
- How many rod holders would you like to have?
- How will you use them (storing extra rods, trolling, rod rests, etc.)?
- Where on the kayak do you want them placed?
Once you decided on these points, you can begin.
Using Gear Tracks
If your kayak already has gear tracks, you can find bases that slide into the
tracks and tighten down. They have mechanisms for attaching the rod holders
themselves. In the Scotty line, the product I have used is called a gear head
track adapter. It is cylinder with a metal foot that slides into the track.
The cylinder is rotated clockwise to tighten the base onto the track. The top
portion of the base has an opening. Twist the upper half of the cylinder and
drop the rod holder into the opening. When you let go, the base should grab the
rod holder firmly. This is a quick and easy way to attach rod holders to a
kayak. It does not require drilling any holes, and the base can be moved around
in just seconds. The following photo shows two of the track-mounted bases with
rod holders inserted on my Native Manta Ray 11. Two trolling rods are deployed.

For storing rods, this type of base works fine. However, if you plan to troll with rod holders in a gear track base, you should be aware that after a fish hits the lure, the rod will swing toward the back. The rod holders on the right side of the kayak will tighten the base, but those on the left side will loosen the base. I lost several fish that way and once lost a rod and reel after the left-side rod holder spun toward the rear.
I devised an alternative way to mount a base on a track. I used the standard Scotty bolt-on base, but attached it to the gear track on a Native Slayer Propel 13 using two track slugs. That type of installation is very solid, and eliminates the twisting issue described above.
The next photo shows front rod holders mounted this way. To keep the rod butts from interfering with the pedaling strokes, I added an extender between the base and the holder.


Attaching to the Hull
If your kayak does not have gear tracks, or the tracks are not in a position where rod holders would be functional or easy-to-use, you can attach the bases directly to the top of the hull. It is important to use stainless steel hardware. Whenever possible, bases should be attached with bolts and nuts, rather than screws. To use nuts, you need to have access to the underside of the location where you want to mount the bases. Many kayaks have small hatches of different sizes and shapes. Several of my kayaks have round hatches behind the seat. For the rod holders I mounted behind my seat on my Native Slayer Propel 13 kayak, I could reach through the hatch with a wrench to hold the nut in place while I tightened the bolt from the top side.
Before drilling any holes to attach a base, I strongly recommend that you sit it the seat and reach fore and aft to make sure you can grab a rod from the rod holder in case of a bite. You want to make sure the rod is close enough to remove from the holder quickly, but not so close that the rod butts bump into the seat frame or interfere with your paddle stroke. The old carpenter’s rule is measure twice, cut once. I measure multiple times before drilling.
The above photo shows the rear mounting position I chose on a pedal drive kayak with a raised seat. The top deck of the kayak was thick and strong enough to support the base with no extra backing. On my new Native Ultimate FX15 kayak, to which I added rod holders this week, the area where I wanted to bolt the bases was not as strong. I made backing plates out of some scraps of plexiglass I had available. The backing plate was drilled out with the same hole spacing as the base and added on the underside of the hull — if a strong fish pulled hard, the nuts would not pull out.
If your kayak does not have an access hatch to allow you to use bolts and nuts for a secure attachment, there are alternatives — rivets or well nuts. I used well nuts on an installation behind the seat on my Manta Ray 11. Well nuts are small rubber grommets with a flange on one end and brass threads inside. A hole is drilled in the hull, the well nut is set in place, and the accessory is screwed into the well nut. As the bolt is tightened, the rubber scrunches up into a “doughnut” on the underside of the hull.
I had a little trouble with one of the bolts failing to make good contact with the well nut. If you choose to use well nuts, I suggest that you insert the screw into the well nut, make sure the threads engage before applying any pressure. Alternately, drill all four holes first, pass the bolts through the accessory and start them into the well nut before setting the well nuts into the holes.
Flush Mount
Some kayaks come with flush mount rod holders already installed or molded into the hull. My Native Slayer Propel 10 pedal kayak came with a flush mount holder to the right of the seat (lower right corner of photo). It was angled slightly forward. It was not suitable for trolling, but I found it to be quite useful when I was trolling from other rod holders and needed to unhook a fish or change a lure. I could set the rod in the flush mount holder and have easy access to the tackle. Flush mount holders can be added by the user, but require drilling a large-diameter hole in the hull.
My Native Manta Ray 12XT kayak came with two molded-in rod holders behind the seat. These are angled out to the side.
The openings are considerably wider than my rod butt. I am reluctant to use those holders for trolling. Instead, I attach a single holder to the small gear track in front of my seat.
Some kayak owners have built “rocket launchers” with multiple PVC pipe tube openings to fit into the flush mount rod holders on their kayaks. This type of system is used for rod storage and for trolling. The photo below came from the Internet — it shows one configuration of this style of rod holder.

Rod Holders Not Attached to Kayak
Many kayak anglers add a crate, tackle bag, or some other device behind the seat for storing gear. Some of these storage containers have rod holder tubes built in or attached to the outside.
Here is a photo of John Rentch using a milk crate with several vertical PVC tubes for rod storage in the rear of his Native Slayer Propel 10.
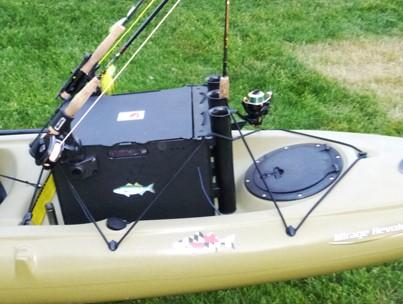
Mark Bange uses a BlackPak storage box in the rear of his Hobie Revo kayak. It has vertical rod tubes built in. Mark attached Scotty fly rod holders to the side of the BlackPak.


Neil Taylor, a Tampa-based guide, uses a soft-sided Native Tackle Buddy bag for carrying gear and up to six rods on his Native Ultimate 14.5 kayaks.
- Jay Mastry - March 26, 2024
- Captains Corner, Gorta - March 23, 2024
- Dave Zalewski - March 12, 2024


